Satellite Tracking
In Part One of this series, we introduced some of the basics regarding the types of satellite. If you’ve made it to this part, I’m going to assume that you’re interested enough to start working them!
Unless you are only going to access the QO-100 geostationary satellite, you’ll need to know what time they will be available to you, and where in the sky they will be.
Az / El / AOS / LOS
There are a couple of terms that you’ll come across time and time again. Az (azimuth) and El (elevation) are fairly common and describe the position of the satellite in the sky.
AOS and LOS describe the times that the satellite will be available at your position. AOS, or Acquisition Of Signal (or Acquisition Of Satellite) tells you the time that the satellite comes over the horizon and can (theoretically) be worked. LOS stands for Loss Of Signal / Loss Of Satellite and is the time that the satellite disappears over the other horizon and can no longer be accessed.
The time between AOS and LOS is the duration of the pass and can range from a few minutes, to 10-15 minutes.
Let’s take an example satellite, travelling from west to east and passing, more or less, directly overhead one morning. Here’s the key information we’ve got so far…
- AOS: 08:12UTC, Az: 270, El: 0
- Apogee / mid-point: 08:18UTC, Az: 0, El: 89
- LOS: 08:24UTC, Az: 90, El: 0
You’ll see this data written out in different formats depending on where you get the information from. However it’s displayed to you, you can see that the satellite will be on the western horizon at 08:12UTC, from which point we should be able to work in until it reaches the eastern horizon, 12 minutes later. Of course, local conditions means that you may not be able to access it for all this time, due to hills, buildings, etc.
Doppler Shift
As the satellite approaches your position, you will need to adjust your frequency due to the effects of Doppler shift. Many of the satellites that we are going to start with (FM satellites) have a UHF downlink and a VHF uplink, i.e. you transmit on VHF but receive on UHF.
Typically, you don’t adjust for Doppler shift on the VHF frequencies, but you do on the UHF ones. If you’re just starting out, I would recommend beginning with the FM satellites and the International Space Station (ISS) is as good a place as anywhere to start.
First off, we need to know the ‘base’ frequencies and we can look this up using the AMSAT website or even a phone app, such as Satellite Tracker for the iPhone. You’ll see that the frequencies for the FM voice repeater is given as:
- Uplink: 145.990MHz (with a CTCSS tone of 67Hz)
- Downlink: 437.800MHz
As we are just going to listen for the moment, we set our radio to 437.800MHz and wait… you hear something but reception doesn’t last long, it’s a bit crackly and not really what we expected.
The problem was that we didn’t adjust for Doppler shift. With most passes we would start reception at 437.810MHz at AOS, moving through 437.800MHz when it is at its highest point, then adjust down to 437.790MHz at LOS. This is a good general rule of thumb for UHF reception – start 10kHz higher at AOS and end up 10kHz lower at LOS.
The greatest amount of Doppler shift is at AOS and LOS, but the greatest rate of change of Doppler shift is as the satellite passes overhead.
In practice this means that to track the satellite correctly, you’ll see that you’ll only need to make infrequent adjustments around AOS / LOS, but as it reaches towards and recedes from its highest point, you’ll be making constant changes. This is especially so for the linear satellites… fortunately the FM satellites are much more forgiving!
Tracking Apps
There are a number of sites available on the internet to help you track the satellites you are interested in. N2YO.com and AMSAT are just two good places to start.
However, I don’t have a base station and so I rely heavily on an app for my iPhone, called Satellite Tracker. Similar applications are available for Android devices too, so check around.

The app allows you to select which satellites you are interested in and most usefully, all the relevant information on one screen when it comes to getting ready to work the required satellite.

We’ll take a closer look at this app in another article, but in the image you can see that it provides a graphical representation of the satellite track (roughly NW to SE), and both uplink and downlink frequencies are given (‘base’ and Doppler corrected). AOS is stated, as is “Time To AOS”, which is very useful! Once the satellite has appeared at the horizon, this changes to show the amount of time left in the pass.

The app also shows data on the next few passes – useful to select potentially usable passes. In the image, the first pass only reaches a maximum elevation of 0.2 degrees above the horizon and the entire pass only lasts 1 minute 34 seconds. With such a low elevation, this one is not going to be workable; whereas later passes reach 64 degrees and 75 degrees elevation.
Tracking Websites
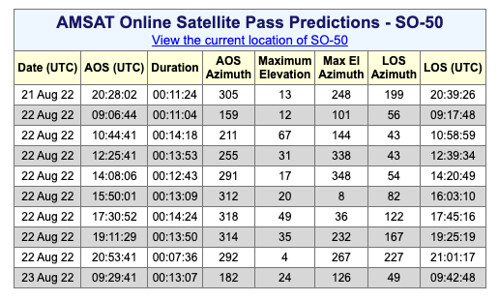
There are a number of satellite tracking websites, which are easy to find with a quick search. Here, I’ll just focus on the AMSAT prediction webpage, which can be found at https://www.amsat.org/track/.

Just select the satellite that you are interested in from the dropdpwn list, enter your position and click on Predict (remember to save your location for future visits). You will then be presented with the satellite data, which should now be recognisable given the information above…
Summary
In this article we’ve taken a look through satellite tracking data, and where to find it. You need to know when you can acquire the satellite, when you will lose it, and where in the sky it will be. You also need to know the frequencies, including the Doppler shift for UHF.
In Part Three, we’ll get around to looking at the basic equipment needed.